


30″x80″ – Welding Table Legs
Product Details
TMW leg kits are engineered to support the full range of welding table tops. Heavy wall tubing, precision-cut gussets, and integrated mounting hardware make these legs stable under load and simple to assemble.
Heavy Wall Tubing
Thick-wall square tubing provides rigidity and vibration dampening. No flex or wobble, even under heavy grinding and hammering.
Precision Fit-Up
All components are laser cut and CNC notched for consistent fit. Legs align with the integrated mounting holes in TMW table top rib sections.
Gusseted Corners
Every leg joint includes welded gusset plates for lateral stability. The finished assembly handles racking forces without distortion.
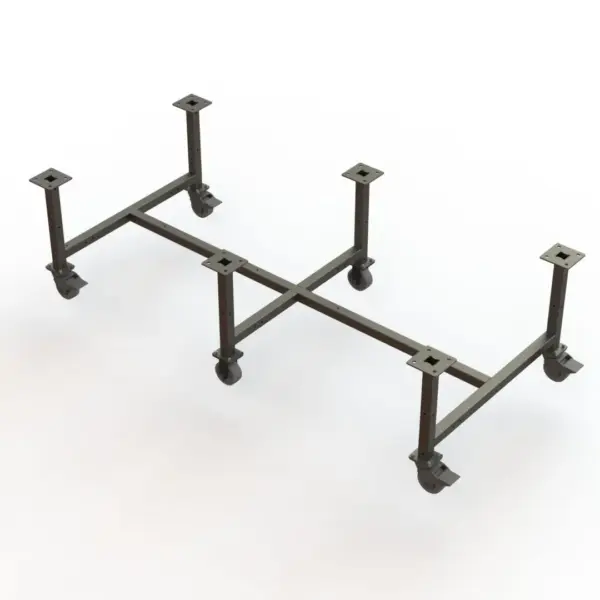
Leg Kit Overview
Kit Includes
Everything needed to build a complete table base. All components are unfinished steel, ready for welding.
- 4 leg tubes (pre-cut to length)
- Top mounting plates with pre-drilled holes
- Bottom foot plates
- Cross bracing tubes (front-to-back and side-to-side)
- Gusset plates for all leg-to-brace joints
- Hardware pack (bolts, nuts, washers for foot attachment)
You Choose
Select the foot type that matches your shop setup.
Leveling Feet
Heavy-duty threaded leveling feet with rubber pads. Best for permanent installations where the table will stay in one location. Provides vibration isolation and allows fine adjustment on uneven floors.
Locking Casters
Heavy-duty swivel casters with brakes. Best for shops that need to move the table for cleaning, rearranging, or sharing floor space. Each caster locks independently for stability during work.
Assembly Instructions
The leg kit assembles in three stages. Basic welding skills and standard shop tools are all you need.
Assemble the Legs
- Lay out all four leg tubes on a flat surface.
- Attach the top mounting plates to the upper end of each leg using the pre-drilled holes as alignment guides.
- Tack weld the plates square to the legs. Use a combination square to verify 90 degrees.
- Attach the bottom foot plates to the lower end of each leg.
- Run full weld beads on all plate-to-tube joints.
Install Cross Bracing
- Stand two legs upright and position a cross brace between them at the designated height.
- Tack weld the brace to both legs, then check for square.
- Repeat for the opposite pair of legs.
- Connect the two leg pairs with the remaining cross braces (front-to-back).
- Verify the base sits flat and is square by measuring diagonals.
- Weld all gusset plates at the brace-to-leg intersections for rigidity.
- Run full beads on all remaining joints.
Attach Feet or Casters
- For leveling feet: thread the feet into the bottom plates and adjust to level.
- For casters: bolt the caster plates to the bottom foot plates using the included hardware.
- Verify all four contact points are even. The table should not rock.
- Place the assembled base in position and set the table top onto the mounting plates.
- Bolt or weld the top to the mounting plates through the rib section mounting holes.
Leg Kit Assembly Instructions (PDF)
Download the complete weldment and table assembly guide with diagrams.
Related products
DIY Welding Tables, Welding Table Legs
50"x100" - Welding Table Legs
Price range: $599.99 through $719.99
Select options
DIY Welding Tables, Welding Table Legs
60"x60" - Welding Table Legs
Price range: $479.99 through $559.99
Select options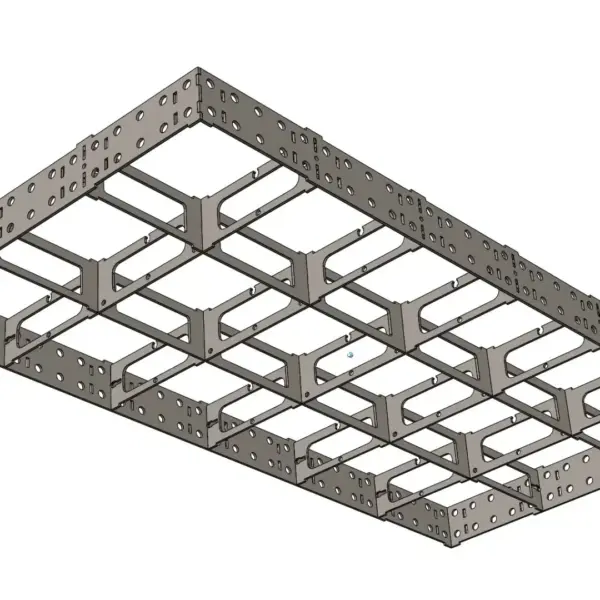
DIY Welding Tables, Welding Table Tops
30"x40" - Welding Table Top
Price range: $599.99 through $899.99
Select options
DIY Welding Tables, Welding Table Legs
40"x80" - Welding Table Legs
Price range: $419.99 through $499.99
Select options